Create e-mail templates
Before you start
|
Why would I use HTML or text e-mail templates?
|
|
Overview of process |
|
Step 1. Create your HTML template List
- In the Setup/Maintenance menu, select Lists and click the 'Add List' button.
- Enter a Description of 'E-mail templates'.
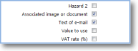
- Click on the Additional Attributes for list entries (advanced) tab.
- Tick the box next to Associated image or document.
- Tick the box next to Text of e-mail.
- Save.
Step 2. Insert dynamic values into the e-mail template
- Open the e-mail created above in your usual HTML or text editor.
- Insert report processing variables and other dynamic values where appropriate in the document.
- HTML templates MUST have angled brackets (< and >) around the dynamic values. For example <%CUSTOMER%> at <%LOCATION%>
-
Text templates should not have these (see below).
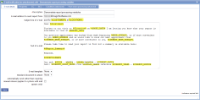
Example of an e-mail using report processing variables
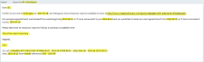
How the above e-mail would look to the customer
- Save.
Step 3. Add HTML templates to the list
- In magic5 click on 'list entries' for the E-mail templates created in Step 1.
- Click on Add item.
- In the List Entry tab enter Text to identify the email in the future (this has no other function) and leave the other prompts blank.
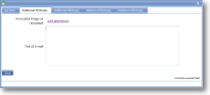
- In the Additional Attributes tab click on Add attachment to upload the HTML e-mail template created in step 2 (if used).
- Open the HTML (if used) in your browser, ensuring that the dynamic values are visible. Select All and Copy to the clipboard.
- If not using HTML, copy the text created in step 2 to the clipboard.
-
Paste the contents of the clipboard into the box titled Text of e-mail.
- Save.
See Also